
Backcountry Adventures in Yosemite and The Sawtooth Range
Tips and Tricks to Winter Backcountry Travel
Over the past couple of weeks, I had the pleasure of adventuring in my backyard in a winter wonderland. Fresh powder, snow-covered mountains, deep red winter sunsets, freezing temperatures, and lots of digging just about sums up both of my backcountry trips. I learned so many great tips and tricks that I wanted to share with on my blog for anyone interested in snow camping. I will be honest; snow camping is a TON of work. You have to WANT to do it, invest in the right gear, practice patience, and be willing to put in the time and energy that is needed to dig out a campsite and boil snow. Setting up a winter camp is especially tough when you have been hiking or skiing for miles and miles carrying a 50-pound pack (lightweight packs do not happen in the winter). On average, it takes about 1.5 hours to set up a winter camp properly, and it can take two hours to boil enough snow for food, hot drinks, and drinking water, so be prepared for late nights, early mornings and spending a lot of time at camp preparing for the next day. I highly recommend bringing a four-season tent and a stove that is compatible with white gas.

International Alpine Guides
The first overnight trip of this winter consisted of a two night, three-day Intro to Winter Mountaineering Course by International Alpine Guides. I was impressed with this company, and this is the first guided service I have ever used in the United States; however, I think I may look into a private guided trip in the future. One of my friends took this course with me which made it more fun as having a familiar face is always a good thing in a group setting.
I have snow camped before and am pretty comfortable hiking and skiing during the winter months, so I signed up for this course to primarily sharpen my winter mountaineering skills. We went up into the Sawtooth Mountains out of Bridgeport, but unfortunately, with 50 mph wind guts and soft snow, there wasn’t a good window for a summit attempt and not much of a chance to practice ice travel with crampons and an ax. We hiked in 4.5 miles wearing snowshoes (I prefer to call them SLOWshoes because I think they are incredibly inefficient, but they are a means to an end), and we set up camp. The next day we practiced basic mountaineering skills, including avalanche rescue and self-arrest. Although I was a bit disappointed that my mountaineering skills did not improve much, I did learn a TON about snow camping, and I was excited to put these skills to good use the following week when a dear friend of mine and I went on a backcountry ski trip in Yosemite.

Badger Pass to Taft Point to Glacier Point: 24 miles
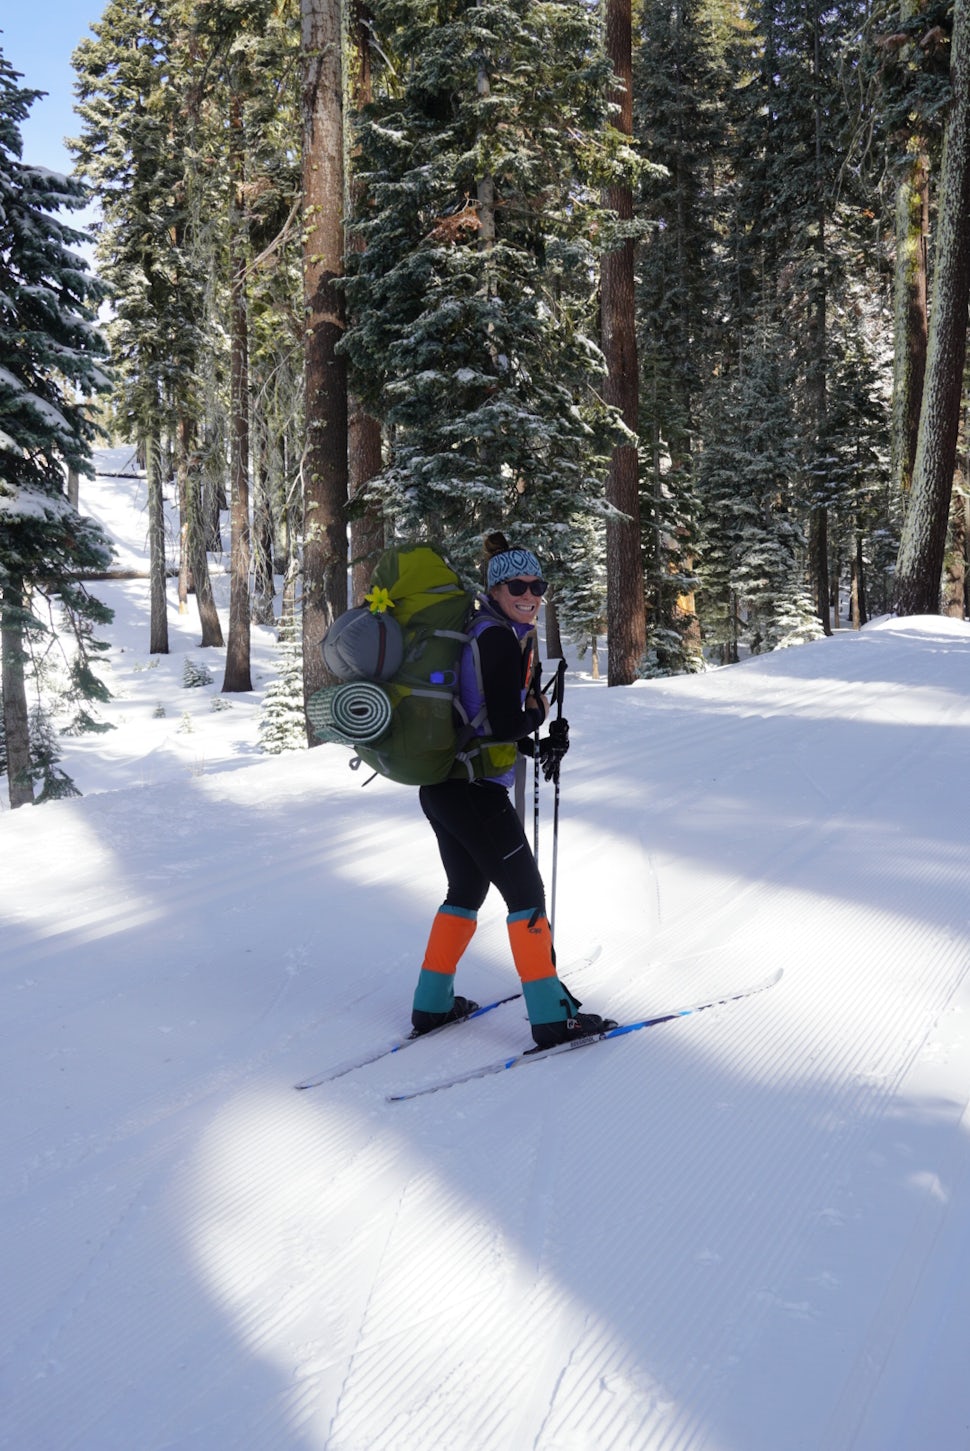
Our Yosemite trip was INCREDIBLE. Just as we arrived, Yosemite had a fresh blanket of 8 inches of snow, and it truly was a winter wonderland. My friend messaged me about this trip, and because of our schedules, we usually only get together for an epic backcountry adventure once a year. When she asked if I wanted to go from Badger Pass to Glacier Point, I cleared my calendar and jumped on the opportunity. She planned on making this trip in snowshoes, and since I spent the previous weekend on snowshoes, bored out of my mind, I asked if she would be okay if I skied while she hiked in SLOWshoes. She agreed it would be fine, and I told her I would try to stay at her pace as much as possible. I carried snowshoes just in case as this was my first time doing big miles on cross-country skis and also my first time carrying a 50 pound pack on skis. This adventure was one of the most physically challenging trips I have ever done, but I loved every minute of it. I was nervous I would tip over or fall downhill with my pack, but I managed to stay skiing upright the entire trip.

Although I ski about four times per week and I try to average 1,000 trail miles each year, this was the first time in the backcountry that I felt like a true badass!
There is so much strength in skiing into the backcountry with a fully loaded pack to spend two nights in below-freezing temperatures. There also maybe a little bit of crazy behind this as well.

I included links to my previous winter outdoor posts, and I hope you enjoy all the tricks and tips I learned during my most recent backcountry winter adventures!
- Nalgene bottles over bladders: This is an old trick but an important one. Nalgene bottles are double-walled, so they are less likely to freeze. Nalgene bottles should be stored in the tent overnight and can also double as a heater when filled with boiling water and put in your sleeping bag at night. Hot Nalgene bottles in your sleeping bag is a great way to keep you warm at night, and then you have drinking water for the next day. When you are sitting at camp, you can also store your Nalgene bottles full of boiling water in your jacket to keep you and the bottles warm before you go into your sleeping bag for the rest of the night.
- Dig out a bench, a kitchen, and a boot well: Digging is the key to making a great winter campsite. You must dig out an area for your tent and pack it down with either skis or snowshoes. You want to pack the snow down enough so that it is firm and level. Once you have your tent set up, dig out a boot well at each vestibule so that way you can stand while inside your vestibule. You can also use your pee bottle in the boot well, arrange everything in your tent while standing in the boot well, and put your boots on while sitting in your tent. After you dig out your boot well, spend some time digging out a kitchen where you can place your stove, your cooking supplies, and your bag of snow. You can make it, so you are sitting on “bench” while your dugout kitchen is below you, or you can dig out a “table” where you can place your stove and kitchen supplies. Make sure to sit on a mat to keep you warm and dry. Sitting on snow is not the brightest idea.
- Winter tent anchors: Anchoring a 4-season tent in the snow is much different than and more involved compared to setting up a summer tent. The tent must be anchored at all points (especially if there is wind), and the anchors must be dug into the snow deep enough so they stay put. The key to this is purchasing snow anchors or finding long sticks and anchoring them perpendicular to the tent grommets by tying them to the guy lines and burying them deep in the snow. This method is known as the dead man’s anchor. You can also use skis and or ski poles to anchor your tent by sticking your ski or pole through the guy lines at an angle deep into the snow.
- Pee bottle: Getting out of the tent and walking out of your camp in 12 degrees in the middle of the night to pee sounds like a nightmare…try changing your tampon in these conditions, even worse. Using a wide mouth pee bottle to pee during the night is a magical trick. You can stand in your boot well in your tent vestibule and pee without post-holing in the middle of the night.
- Hand and toe warmers: This is nothing new, but hand warmers are a godsend in the winter backcountry. I mainly use them at night in my sleeping bag, and I also put a pair in my boots overnight, so they are nice and warm in the morning. Regardless of my boots and my socks, my toes are always cold, so I started wearing toe warmers in between my sock liner and my wool ski sock, and so far, this seems to keep my toes a bit warmer. I also keep a pair of hand warmers in my first aid kit all year around just in case.
- Sleep with electronics in a sleeping bag: Electronics are not very happy in freezing temperatures. I always keep my electronics in a dry sack and sleep with them at the bottom of my sleeping bag at night. This way, they do not freeze, and they hold their charge throughout the entirety of my trip.
- Stomp out tent space with snowshoes or shovel: Packing down your campsite is imperative.
- Melting snow: Boiling snow is like watching paint dry, it is boring, and it takes forever. On our Yosemite trip, we spent two hours each night and one hour in the morning boiling snow for meals, hot drinks, and drinking water. Make sure you have a stove that is compatible with white gas, as Jet boil stoves do not work because they use a combination of propane and isobutane, which do not do well in freezing temperatures. You will need a larger pot as you will need a lot of snow to boil a little bit of water. In other words, the frozen state of water takes up much more volume than its liquid state, so be ready to have a storage bag of snow on hand when boiling snow. Always bring extra fuel canisters as melting snow and subsequently boiling the water takes a lot of fuel. Always start with a tad bit of water at the bottom of the pot, so you do not burn the pot when melting snow.
- Transition between skis and snowshoes or skis and skins. Bringing two methods of transport, whether it is snowshoes and skis or skis with skins, is essential as some trails may have a steep gradient, and you will need some sort of traction device to help you up that hill. You can also just stick to snowshoes if you want to, but that is just too boring and slow for me.
- Reading book: I bring a book everywhere I go. Whether I am going to the car wash, an appointment, a lunch meeting, or in the backcountry, I always have a book on hand to pass the time. Yes, I am aware that carrying a book into the backcountry may seem like too much weight, and yes, everyone always comments, but I do not care. I am an avid reader, and there is nothing I love more than passing idle time reading a book, whether it is waiting for snow to melt over the fire, waiting for my backcountry partner to get ready in the morning, or reading before bed. There are many times on winter expeditions where we could not leave camp because of the conditions, and instead of staring at my tent walls, I was able to dive deep into my book. It is these days that everyone tells me they also wish they brought a book.
- Crampons if you plan on traversing ice at an angle: If you plan on traveling in hard-packed snow or ice at an angle than crampons are a must. If you are carrying crampons, then you should also be taking an ax and a helmet and have the skillset to use these tools.
- 4-season tent vs. 3-season tent: I admit that I have snow camped using a 3-season tent mainly because I do not own a 4-season tent, but when I do have the option to use a 4-season tent it is always so much warmer!
- Share a tent; it’s warmer: I am a huge fan of splitting and sharing gear. It is less weight to carry and sharing a tent is much warmer in the winter. I will never understand those who do not like sharing a tent, but everyone is different, I guess. Sharing is caring!
- Double sleep mats: I always sleep with a Therm-a-Rest closed-cell sleep pad underneath my inflatable sleep pad. This double layer is more insulation and will keep you much warmer. I also use my closed cell pad for sitting on and rest my feet on at camp.
- Sit mat: A sit mat is necessary for sitting around camp. I use my closed-cell sleep pad as my sit mat.
- Boots in trash bags: Place your boots and gaiters in trash bags, put hand warmers in your boots, and store the trash bag at your feet in the tent overnight. That way, your boots stay warm and dry, and your tent stays clean.
- Stuff puffy jackets in a sleeping bag for extra warmth: Sometimes, my right elbow or left hip will be cold at night. I will stuff one or both of my puffy jackets in my sleeping bag to stay warm and to also keep them warm for the morning. Putting on cold clothes in the morning in below-freezing temperatures is not fun.
- Snow bag: Bring an extra trash bag to store snow when you are melting snow at your camp kitchen.
- Boots off the ground to keep feet warm: Try to keep your feet off the snow when hanging around camp. Stand on a sleeping pad or even better sit on a sleeping pad with your boots off the ground. Your feet will be much happier.
- Plasma lighter (rechargeable): This electric lighter is my new favorite backcountry item. It is rechargeable and works in every single winter condition.
- Aluminum foil for insulation: Bring extra sheets of aluminum foil to help keep your food warm. Wrap around your bowl and mug and use it as a cover or wind guard. Once your hot food hits the 15-degree air, it gets cold faster than you may be able to consume it.
- Shovel: This is necessary. You must bring a shovel not only as part of your avalanche kit but also to dig out your campsite.

Below are links to all my winter blogs
The ultimate winter guide for adventuring in the Eastern Sierra
We want to acknowledge and thank the past, present, and future generations of all Native Nations and Indigenous Peoples whose ancestral lands we travel, explore, and play on. Always practice Leave No Trace ethics on your adventures and follow local regulations. Please explore responsibly!
Do you love the outdoors?
Yep, us too. That's why we send you the best local adventures, stories, and expert advice, right to your inbox.


